Halo hair extensions are known for their comfort quick installation and impressive ability to blend with natural hair However achieving a seamless look requires the right technique This guide walks you through every step from installation to color matching and blending so you can create a flawless natural finish every time.
What Are Halo Hair Extensions
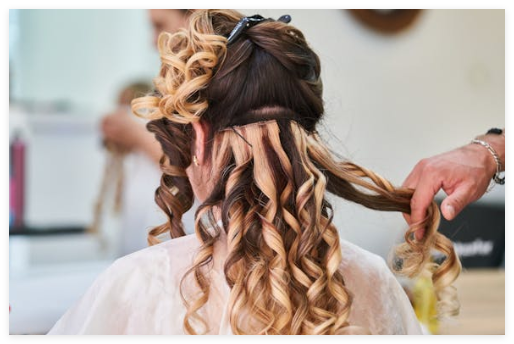
Halo extensions are a no clip no glue and no tape option They sit on an invisible wire that rests around the crown of the head like a headband The hair weft lies underneath your natural top layer which later falls over the wire to hide it completely This type of extension is ideal for beginners for those who want instant volume and length and for anyone looking for a gentle non damaging method
Step by Step Guide How to Install Halo Extensions
Prepare Your Natural Hair
Start with clean dry and tangle free hair Brush it smoothly so the halo sits flat and blends into your own hair If your hair is very silky add a small amount of texture spray or dry shampoo at the roots to help the halo wire stay in place
Create a Base Section
Use a comb to separate a top layer of hair from temple to temple Clip this top section up This layer will later cover the wire and help the extensions stay hidden
Position the Halo Wire
Hold the halo like a headband and place the wire around the crown The wire should sit a little behind your hairline and the weft should sit comfortably above the bump on the back of your head Make sure the wire feels snug but not tight Adjust the wire length if needed
Release and Blend
Let down the top section of your natural hair and allow it to fall over the extension Brush gently to help your hair merge with the halo extension This hides the wire and creates a seamless look
Final Blending
Brush both your own hair and the extensions together For the best result curl or straighten both at the same time so the textures match perfectly Blending is the key to achieving a natural finish
How to Adjust the Wire and Weft for a Better Fit
Adjust the wire so the halo stays secure If it feels loose tighten it If it feels uncomfortable loosen it The weft should sit centered and level not too high and not too low Proper adjustment makes the extensions look more realistic and ensures they stay in place throughout the day
How to Choose the Right Color Thickness and Density
A natural blend starts with choosing the right shade thickness and texture
Choose your color based on the mid lengths and ends of your hair since these are the areas extensions blend with best If your shade falls between two colors choose the lighter one because it is easier to tone down A multidimensional shade blends better than a flat color
Match the texture of the extensions with your natural hair Whether your hair is straight wavy coarse or silky a texture mismatch will make the extension look obvious
Choose a thickness that matches your natural density If you have fine hair choose a lighter density If your hair is thick choose a fuller halo Avoid selecting very thick extensions if your natural hair is soft and fine because it will create an unnatural line between your hair and the extension
Helpful Tips and Mistakes to Avoid
Use a brush with soft bristles to smooth the top layer over the wire Add a gentle bend to your hair and the extension to help them merge Trim the extensions slightly if needed so they match your haircut
Avoid wearing the halo too close to the front hairline Avoid choosing a shade that matches your roots instead of your mid ends Avoid skipping the blending step and avoid using very heavy halos on thin hair These mistakes make the extension visible
Final Thoughts
Halo extensions offer immediate transformation without damage With the right installation blending and color selection they can look completely natural The more carefully you adjust and blend the halo the more seamless and realistic it becomes